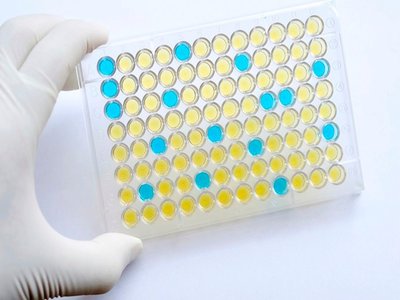
When it comes to running a successful ELISA, there can be many common issues that must be addressed in order to obtain meaningful results. From our years of experience in producing and supplying ELISAs for a diverse range of targets, we’ve narrowed down four of the most common issues that can arise during your ELISA and have provided troubleshooting tips for each.
1. Poor standard curve
The resulting standard curve is perhaps the most important part of your ELISA. From these curves, you are able to determine the concentration of the target peptide, protein, or antibody within your experimental sample.
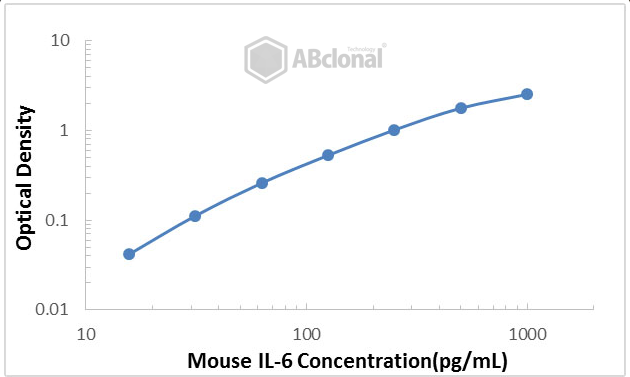
Figure 1. An example of a standard curve generated using our Mouse IL-6 ELISA Kit (Catalog No. RK00008). Optical density is plotted against the concentration of the target protein measured in pg/mL.
Figure 1 above is a typical example of a standard curve generated from running an ELISA. This specific kit was used to detect the concentration of mouse IL-6, a pro-inflammatory cytokine. Common issues with the standard curve can include inconsistent values for optical density at each concentration, ultimately generating a poorly fit curve with a low R2 value (should ideally be > 0.99).
Cause #1: Pipetting error
One of the most common causes for a poorly fit standard curve are pipetting errors, which can result in an incorrect concentration of reagents added to the ELISA sample wells. Especially when using multichannel pipettes, it's important to ensure that your pipettes are accurately calibrated and used following the manufacturer's standard. A succinct guide to accurate and efficient pipetting can be found here. Unfortunately, pipetting errors are not usually correctable after the fact, and therefore repeating the ELISA may be necessary. To minimize pipetting error, ensure that:
1. The tip is firmly sealed onto the pipette
2. Tips are changed between each reagent and sample.
3. There are no air bubbles in the well or pipette tip.
4. The reagent/sample is dispensed against the side of the well to minimize the risk of splashing and cross-contamination.
5. Tips are "rinsed" using successive aspiration/dispense cycles.
Cause #2: Degraded/incorrect standard solution
A second common cause of poor standard curves is a degraded standard stock solution. This can occur because of improper storage of the stock solutions and reagents within the ELISA kit/assay. Ensure that the stock solution is diluted and stored for use according to protocol, and also be sure to double-check your dilution calculations. With a degraded standard, the resulting optical density (OD) values will likely be lower than expected, resulting again in an inconsistent standard curve. With an incorrect stock concentration of standard, the error in OD values would depend on whether the concentration is over or under diluted. Regardless of whether the standard solution is degraded or mixed to an incorrect concentration, a repeat of the assay is necessary with attention paid to sample and standard solution storage according to manufacturer standards.
2. High Background
At the end of an ELISA, the ability to derive meaningful results from your data is highly dependent on the signal-to-noise ratio. The signal-to-noise ratio is a measure that quantifies and compares the level of a desired signal to the level of background noise. A low signal-to-noise ratio indicates that there is a higher than optimal background noise, reducing the sensitivity of your assay. Let's take a look at some common causes and solutions for high background noise in your ELISAs.
Cause #1: Insufficient wash steps
Wash steps indicated in the protocol are crucial to removing any unbound materials (ie. non-specifically bound antibodies, proteins, and detection reagent) that remain in the microplate wells. These unbound materials can significantly increase background noise and generate false positives for detection, rendering your results unreadable. When washing, ensure that the wash buffer is completely removed after each wash step by carefully aspirating or decanting. It may be necessary to add an additional wash step and increase the duration of each soak by 30 more seconds to ensure that each well is sufficiently cleaned. At the end of each wash step, invert the plate on a sterile and absorbent tissue or paper towel. If there is residual wash buffer or liquid remaining in the wells, gently tap the bottom of the plate while it's inverted to fully drain each well. If you're using an automated microplate washer, be sure that its dispensing tubes are well-cleaned before use.
Cause #2: Inadequate blocking buffer
Another common cause of high background noise in ELISAs is the use of an inadequate or unoptimized concentration of blocking buffer. Perhaps even more important than the wash steps, the blocking buffer is a solution of irrelevant protein(s) that passively adsorb to remaining non-specific binding surfaces of the microplate well. Ideally, the blocking buffer will bind to all sites of non-specific interaction without altering or interfering with the target epitope for antibody binding and further detection. If your results show a high background, it may be necessary to optimize your blocking buffer solution by increasing its concentration. You can also adding a small amount of a non-ionic detergent (ie. Tween 20) as a cost-effective and stable option for reducing high background noise.
Cause #3: Excessively long incubation periods
It is also important to strictly adhere to the incubation times indicated in protocols for manufactured ELISA kits. Many of these kits, including our sandwich ELISA kits, are pre-optimized to ensure that the incubation times will result in accurate and specific binding of the capture and detection antibodies to the target analyte. If you are developing an ELISA using antibody pairs, further optimization may be required.
3. Weak or No Signal
A weak or lack of signal can indicate that there is an undetectably small concentration of target protein within your sample. If you are confident in your collected samples and know that they have not degraded, then the more likely explanation is that there is an issue with the assay itself, or the reagents that comprise it.
Cause #1: Reagents not at room temperature to start the experiment
Our ELISA kits require that you bring all reagents to room temperature prior to setting up and running the ELISA. This can be achieved by allowing the reagents to sit at the bench for 15-20 minutes in order to bring them to room temperature. Running the ELISA with cold reagents can hinder specific binding within the assay to the target analyte.
Cause #2: Insufficient or incorrect capture/detection antibody
When developing your own ELISA in-house, you want to be sure that you are adding the reagents in the correct, predetermined order. Additionally, double-check your dilutions for each reagent and be sure that the volumes are correct if you have kept your diluted stock tubes. Yet another advantage of using our ELISA kits is avoiding this issue entirely, as all reagents are pre-optimized.
Cause #3: Scratched/damaged sample wells
Most manufacturers' kits come with plates that are pre-coated with capture antibody. Pipette and autowasher tips can scratch and damage the the walls of the sample wells when aspirating into and out of the plate, prohibiting the capture antibody from binding to the analyte and generating a weak or non-existent signal. As mentioned before, if you are pipetting by hand, gently place the tip against the side to avoid splashing and to ensure that the tip does not damage the well. When using a plate washer, ensure that the machine is properly calibrated and the plate is positioned so that the tips of its tubes do not touch the bottom or sides of the sample well.
4. High Coefficient of Variation (CV)
When using ELISAs, you want to have as low of a coefficient of variation (CV) as possible. The CV value is a numerical ratio that describes the level of variability within a population, calculated by dividing the standard deviation of a set of measurements by the mean of the set. A low CV between sample replicates indicates that the experiment was run correctly and that the resulting standard curve is precise and accurate. The following may be causes of a high CV.
Cause #1: Bubbles in wells
When pipetting reagents and samples into the plate, you may see small bubbles form within the wells. It is extremely important to remove all of these bubbles before running the ELISA, as it can affect both absorbance readings and result in incorrect concentrations of sample reagents being dispensed into each sample well. When pipetting by hand, pay close attention to your angles of approach; use a 45 degree angle when dispensing and aspirate at a 90 degree angle. After fully dispensing the fluid in your pipette, release the plunger slowly and carefully to reduce the risk of bubbles forming. Although it may be time-consuming, careful pipetting can prove to be a major factor in saving yourself from the headache of inconsistent results.
Cause #2: Insufficient washing
Another potential cause of a high CV is that the sample wells were not washed equally or thoroughly enough. As previously mentioned, the wash steps are vital to ensuring that there are no contaminants or non-specifically bound molecules leftover in the sample wells. Again, increasing the soak duration during the wash step by an additional 30 seconds is recommended if you are seeing a high CV. If you're using an automated plate washer, make sure that the dispensing tubes are not obstructed in addition to ensuring that they are cleaned before use.
Cause #3: Edge effect
The "edge effect" is a fairly common issue that can arise. As its name suggests, it is when the wells at the edge of the sample plate show a different (either higher or lower) absorbance than those in the interior. Figure 2 below illustrates the edge effect on a 96-well plate:
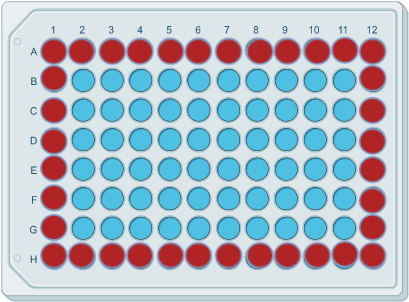 Figure 2. An illustration of the "edge effect" on an ELISA plate. The peripheral wells highlighted in red indicate a different absorbance than those in the interior, highlighted in blue.
The edge effect is usually caused by a difference in temperature across the plate, affecting the kinetics of the reagents within each well, as well as measurements for absorbance. In order to avoid the edge effect, ensure again that all reagents are prepared and mixed thoroughly at room temperature. In addition, at room temperature incubation steps, it may be necessary to precisely control the temperature of the plate by using an incubator.